

Woodworking logic puzzle plans are fun, rewarding projects that combine hands-on craftsmanship with problem-solving. They make excellent gifts, family activities, educational games, and decorative items for your workshop. If you are new to woodworking, start with simple designs that use small wooden pieces, straightforward cuts, and basic hand tools.
In this beginner-friendly guide, we will cover two classic projects: the Two Rings Puzzle and the Dagger Puzzle. Each plan includes materials, tools, dimensions, a basic cut list, step-by-step building instructions, safety guidance, finishing tips, customization ideas, and maintenance advice.
These are practical starter designs, not dimensioned reproductions of a specific commercial plan. The measurements below are suggested starting dimensions and can be adjusted to suit your materials.
1. DIY Wooden Two Rings Puzzle Plan
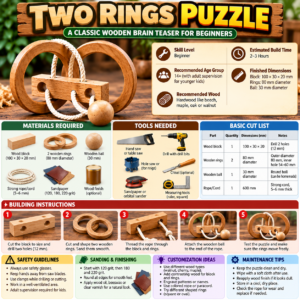
Materials required
- One hardwood or softwood block, approximately 100 × 30 × 20 mm.
- Two wooden rings, approximately 80 mm in outside diameter.
- Strong, non-stretch cord, approximately 5–6 mm thick.
- One small wooden ball or bead, approximately 25–30 mm.
- Wood glue if your design requires permanently attached components.
- Sandpaper in 120, 180 and 220 grit.
- Optional non-toxic wood oil or wax.
Tools needed
- Ruler, pencil and square.
- Hand saw or securely mounted saw.
- Drill and suitable wood drill bits.
- Clamps or a bench vise.
- Sanding block.
- Safety glasses and a dust mask.
Basic cut list
| Part | Quantity | Suggested dimensions |
|---|---|---|
| Main block | 1 | 100 × 30 × 20 mm |
| Wooden rings | 2 | 80 mm outer diameter |
| Wooden ball/bead | 1 | 25–30 mm diameter |
| Cord | 1–2 lengths | Approximately 300 mm each |
These are suggested dimensions; cord length and hole placement depend on your chosen puzzle design. Buy ready-made wooden rings and a wooden ball if you do not have the tools or experience to turn them safely.
Building instructions
- Prepare the block. Measure and mark the center points for two holes. Keep enough wood around each hole to prevent splitting.
- Cut and smooth the block. Cut the block to size, secure it with clamps, and sand away rough edges.
- Drill the holes. With eye protection and the workpiece securely clamped, drill two holes sized to suit the cord. Avoid holding small pieces by hand.
- Prepare the rings. Use ready-made wooden rings or make them with appropriate equipment and a safe jig. Sand them until smooth.
- Thread the cord. Route the cord through the block and rings according to your intended puzzle arrangement. Secure any fixed ends so they cannot pull loose.
- Attach the ball. Secure the wooden ball to the designated cord end if required by the design.
- Test the puzzle. Check that the rings move freely and that no cord ends, splinters or sharp edges create hazards.
Safety guidelines
Wear safety glasses when cutting or drilling. Clamp the workpiece securely, keep fingers away from blades and drill bits, and follow the tool manufacturer’s instructions. Use dust extraction or suitable respiratory protection while sanding, and work in a ventilated area. Young makers should have direct adult supervision, particularly when power tools are involved.
Sanding and finishing
Sand progressively from 120 grit to 180 and then 220 grit. Round exposed corners slightly for comfortable handling. Remove dust before applying a child-appropriate, fully cured wood oil or wax according to its label. Avoid finishes that remain sticky or leave loose residue.
Customization ideas
Try contrasting woods, different ring sizes, engraved initials, colored cord or a personalized wooden base. You can also vary the routing of the cord to create a more challenging puzzle, provided the assembly remains sturdy.
Maintenance tips
Keep the puzzle dry and clean. Wipe it with a soft cloth after use, check the cord regularly for fraying, and replace damaged components. Store it away from excessive heat and moisture to reduce cracking or warping.
>>> Click Here To Access 15+ Woodworking Logic Puzzles Plan Now!
2. DIY Wooden Dagger Puzzle Plan
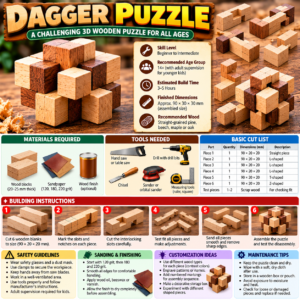
Materials required
- Straight-grained wood stock, approximately 20–25 mm thick.
- A paper template showing the intended piece shapes and slots.
- Pencil, ruler and masking tape.
- Wood glue only if the design includes permanently joined sections.
- Sandpaper in 120, 180 and 220 grit.
- Optional non-toxic wood oil or wax.
Tools needed
- Hand saw or safely set up table saw.
- Coping saw or another suitable tool for internal cuts.
- Ruler, pencil and combination square.
- Clamps or a bench vise.
- Chisel and mallet, if needed for carefully removing waste.
- Sanding block and safety glasses.
Basic cut list
| Part | Quantity | Suggested starting size |
|---|---|---|
| Main puzzle pieces | 6 | Blanks around 90 × 20 × 20 mm |
| Interlocking slots | As required | Mark from a verified template |
| Test pieces | 1–2 | Scrap wood for checking fit |
The blank dimensions are starting points, not a complete cutting diagram. Exact slot positions and depths must match the chosen puzzle geometry; cutting identical blanks without a template may not produce a solvable puzzle.
Building instructions
- Draw the design. Prepare a full-size paper template with each piece, slot and notch marked. Check that the pieces can slide together and apart in a logical sequence.
- Prepare the wood. Select straight-grained stock without cracks or loose knots. Mark the blanks and label each piece.
- Cut the blanks. Cut the pieces slightly oversize if necessary, then bring them to the final dimensions using a safe, controlled method.
- Mark the slots. Transfer the template measurements accurately to each piece. Mark waste areas clearly before cutting.
- Cut the interlocking features. Remove small amounts of material at a time. Use a coping saw or suitable hand tools for controlled cuts, keeping the work securely clamped.
- Test the assembly. Fit the pieces together gradually. If they bind, identify the contact point and remove only a small amount of material.
- Finish the pieces. Once the puzzle assembles and separates correctly, smooth the edges and apply a suitable finish.
Safety guidelines
Use eye protection during cutting and chiseling. Secure each piece with clamps, keep hands clear of cutting paths, and never force a tool through resistant wood. Small parts should not be cut while held in the hand. Follow the equipment instructions and seek experienced supervision when using unfamiliar machinery.
Sanding and finishing
Sand each piece with 120-grit paper, followed by 180- and 220-grit paper. Smooth all corners and remove dust before applying a thin coat of suitable wood oil or wax. Allow the finish to cure fully before assembling the puzzle. Avoid excessive finish on mating surfaces, as it may change the fit.
Customization ideas
Use two contrasting wood species to make the pieces easier to distinguish. Add engraved numbers or discreet markings to indicate the assembly sequence, or create a small wooden storage box. Once the basic design works, experiment with different slot arrangements using scrap wood first.
Maintenance tips
Store the puzzle in a dry location and keep the pieces together in a box or pouch. Wipe off dust with a dry cloth and inspect the pieces for cracks, splinters or loose sections. If wood swells because of humidity, allow it to dry naturally before making any adjustments. Avoid forcing tightly fitted pieces apart.
Beginner tips for successful woodworking puzzles
- Start with scrap wood to practise measuring, drilling and cutting.
- Make a paper template before cutting puzzle pieces.
- Test the fit frequently rather than removing too much wood at once.
- Choose simple designs before attempting complex interlocking mechanisms.
- Keep a record of measurements so you can recreate or modify a successful project.
Final recommendation: Start with the Two Rings Puzzle if you are new to woodworking. It requires fewer precision cuts and helps you practise measuring, drilling and finishing. Move on to the Dagger Puzzle when you feel confident making accurately fitted components.
>>> Click Here To Access 15+ Woodworking Logic Puzzles Plan Now!